Disclaimer
All information shown on this page is for illustrative purposes only and should not be construed as investment, financial, market or other advice. Any information shown on this page that purports to be based upon past or current market conditions may not be complete, timely or accurate and, in any event, is not predictive of future outcomes.
Report This Indicator
(Multi-Target Options Trade Plan Pro — Trigger, Target & Trai)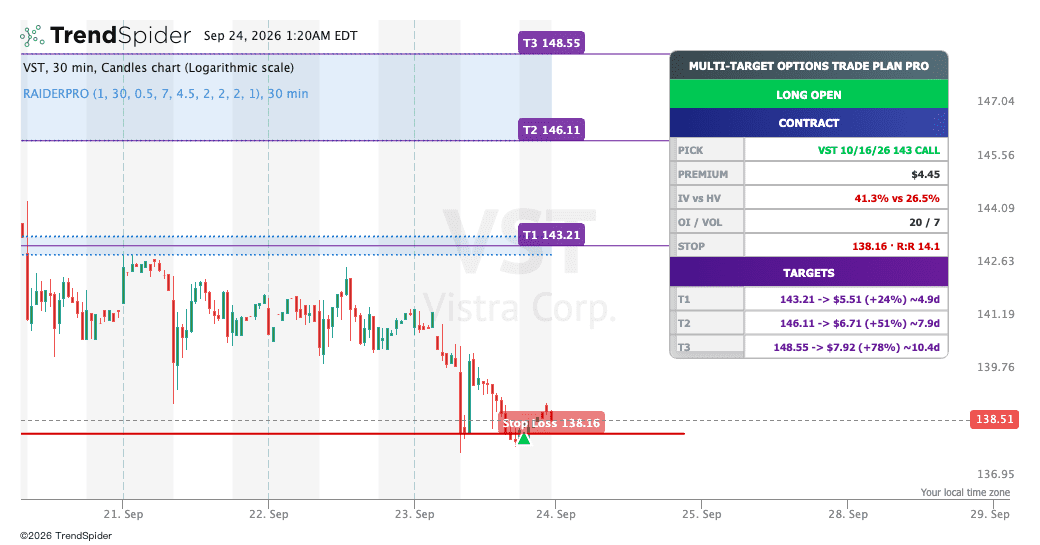
Multi-Target Options Trade Plan Pro — Trigger, Target & Trailing Stop
A complete options trade plan on the 30-minute chart: direction, entry trigger, a ladder of price targets, the contract to trade, and a trailing stop — with every target priced in what the option is projected to be worth when price gets there.
You see the payoff before you commit the capital. This is the indicator behind every setup I post on StockTwits.
📺 Video tutorial (3 min) — how to read the full trade plan on a real chart. It covers the side, the trigger, the T1–T4 ladder, the stop and the contract, and how to plan around earnings: https://youtu.be/TH2JonFR8mw
What it does
🧭 Picks the direction worth trading. With targets on both sides it takes the larger move, not the nearer one — and stands aside if a smaller target sits in the way.
🚫 Refuses trades that aren't worth the risk. Every target must clear a minimum reward-to-risk against the stop and a minimum distance from entry, scaled to the instrument's own volatility. Levels sitting on the reversal area are dropped and the next one out takes their place.
⚡ Calls the trigger. The panel flips from WAITING to LONG OPEN or SHORT OPEN the moment the reversal fires, and a marker shows the bar it opened on.
🔔 Alerts you. Long trigger, short trigger and stopped out are registered signals, so you can be told instead of watching the chart.
🎟️ Names the contract. Ticker, expiration, strike and type, with premium, IV vs HV, open interest and volume.
📊 Prices every target. Each rung is valued with Black-Scholes-Merton using the contract's own implied volatility and a time estimate from the underlying's actual pace.
🛡️ Manages the risk. A trailing stop that sets on entry and ratchets in your favour, never loosening, with live reward-to-risk beside it.
When it stays quiet
Most of the time there is no trade, and the panel says why. WAITING means a target is set and the trigger hasn't fired — the targets are already listed. STANDING ASIDE means a smaller target sits in the way of the larger move. NO TARGET means nothing clears the risk rules. All three are the tool working, not failing.
How to use it
Built for the 30-minute chart — trades lasting a day to a few days, until a target hits or the trail takes you out.
Liquidity is the requirement, not fundamentals. Index ETFs like SPY, QQQ and IWM are excellent candidates, as are heavily traded large caps. On thin names the spread eats the move before you do.
Use the ladder to scale out. T1 is your first exit; the outer rungs are where the trade pays. The strike is set at the final target, so when the rungs are far apart the nearest one can show a small or negative value — that's expected.
You want IV below HV: the option is cheap relative to how the underlying actually moves. When the day's volume exceeds open interest on the picked strike, new positions are being opened there today.
Confirm the turn with Momentum Reversal Signals, Reversal Radar or Bottom Reversal Finder, or read the structure around your targets with GEX Wall + 0DTE Expected Move and Gamma Pin or Breakout Signal.
Projected values are model estimates, not promises. The maths assumes implied volatility holds steady and estimates timing from recent pace.
📈 Watch me trade it — my live 30-minute setups on StockTwits, taken with this indicator: stocktwits.com/winvestinsights
📬 Free weekly newsletter — market structure, options flow, and the longer-term positions I'm building: winvest-insights.beehiiv.com
For educational purposes only. Not financial advice.
Traders also viewed